
This page has instructions for setting up AWS Database Migration Service (DMS) to migrate data to CockroachDB from an existing, publicly hosted database containing application data, such as PostgreSQL, MySQL, Oracle, or Microsoft SQL Server.
For a detailed tutorial about using AWS DMS and information about specific migration tasks, see the AWS DMS documentation site.
For any issues related to AWS DMS, aside from its interaction with CockroachDB as a migration target, contact AWS Support.
Using CockroachDB as a source database within AWS DMS is unsupported.
Setup
Complete the following items before starting the DMS migration:
Configure a replication instance in AWS.
Configure a source endpoint in AWS pointing to your source database.
Ensure you have a secure, publicly available CockroachDB cluster running the latest v22.2 production release, and have created a SQL user that you can use for your AWS DMS target endpoint.
If your CockroachDB cluster is running v22.2.4 or later, set the following session variables using
ALTER ROLE ... SET {session variable}:ALTER ROLE {username} SET copy_from_retries_enabled = true;ALTER ROLE {username} SET copy_from_atomic_enabled = false;This prevents a potential issue when migrating especially large tables with millions of rows.
Manually create all schema objects in the target CockroachDB cluster. If you are migrating from PostgreSQL, MySQL, Oracle, or Microsoft SQL Server, you can use the Schema Conversion Tool to convert and export your schema.
- All tables must have an explicitly defined primary key. For more guidance, see the Migration Overview.
- Drop all constraints per the AWS DMS best practices. You can recreate them after the full load completes. AWS DMS can create a basic schema, but does not create indexes or constraints such as foreign keys and defaults.
- Ensure that any schema changes are also reflected on your target tables, or add transformation rules to your table mappings. If you make substantial schema changes, the AWS DMS migration can fail.
If you are migrating to a CockroachDB Cloud cluster and plan to use replication as part of your migration strategy, you must first disable revision history for cluster backups for the migration to succeed.
Warning:You will not be able to run a point-in-time restore as long as revision history for cluster backups is disabled. Once you verify that the migration succeeded, you should re-enable revision history.- If the output of
SHOW SCHEDULESshows any backup schedules, runALTER BACKUP SCHEDULE {schedule_id} SET WITH revision_history = 'false'for each backup schedule. - If the output of
SHOW SCHEDULESdoes not show backup schedules, contact Support to disable revision history for cluster backups.
- If the output of
If you are migrating to CockroachDB Dedicated, enable CockroachDB log export to Amazon CloudWatch. This makes CockroachDB logs accessible for troubleshooting. You will also need to select Enable CloudWatch logs in your DMS task settings.
Supported database technologies
As of publishing, AWS DMS supports migrations from these relational databases (for a more accurate view of what is currently supported, see Sources for AWS DMS):
- Amazon Aurora
- Amazon DocumentDB (with MongoDB compatibility)
- Amazon S3
- IBM Db2 (LUW edition only)
- MariaDB
- Microsoft Azure SQL
- Microsoft SQL Server
- MongoDB
- MySQL
- Oracle
- PostgreSQL
- SAP ASE
Best practices
We strongly recommend the following best practices:
Do not issue reads while AWS DMS is running. AWS DMS runs explicit transactions, which can cause contention. If you need to issue reads, use follower reads.
Do not run additional workloads (e.g., benchmarking) while AWS DMS is running.
To conserve CPU, consider migrating tables in multiple replication tasks, rather than performing a full load in a single task.
If you perform a full load, you can improve performance by defining a parallel load setting for selected columns. See Table Mappings.
Step 1. Create a target endpoint pointing to CockroachDB
- In the AWS Console, open AWS DMS.
- Open Endpoints in the sidebar. A list of endpoints will display, if any exist.
In the top-right portion of the window, select Create endpoint.
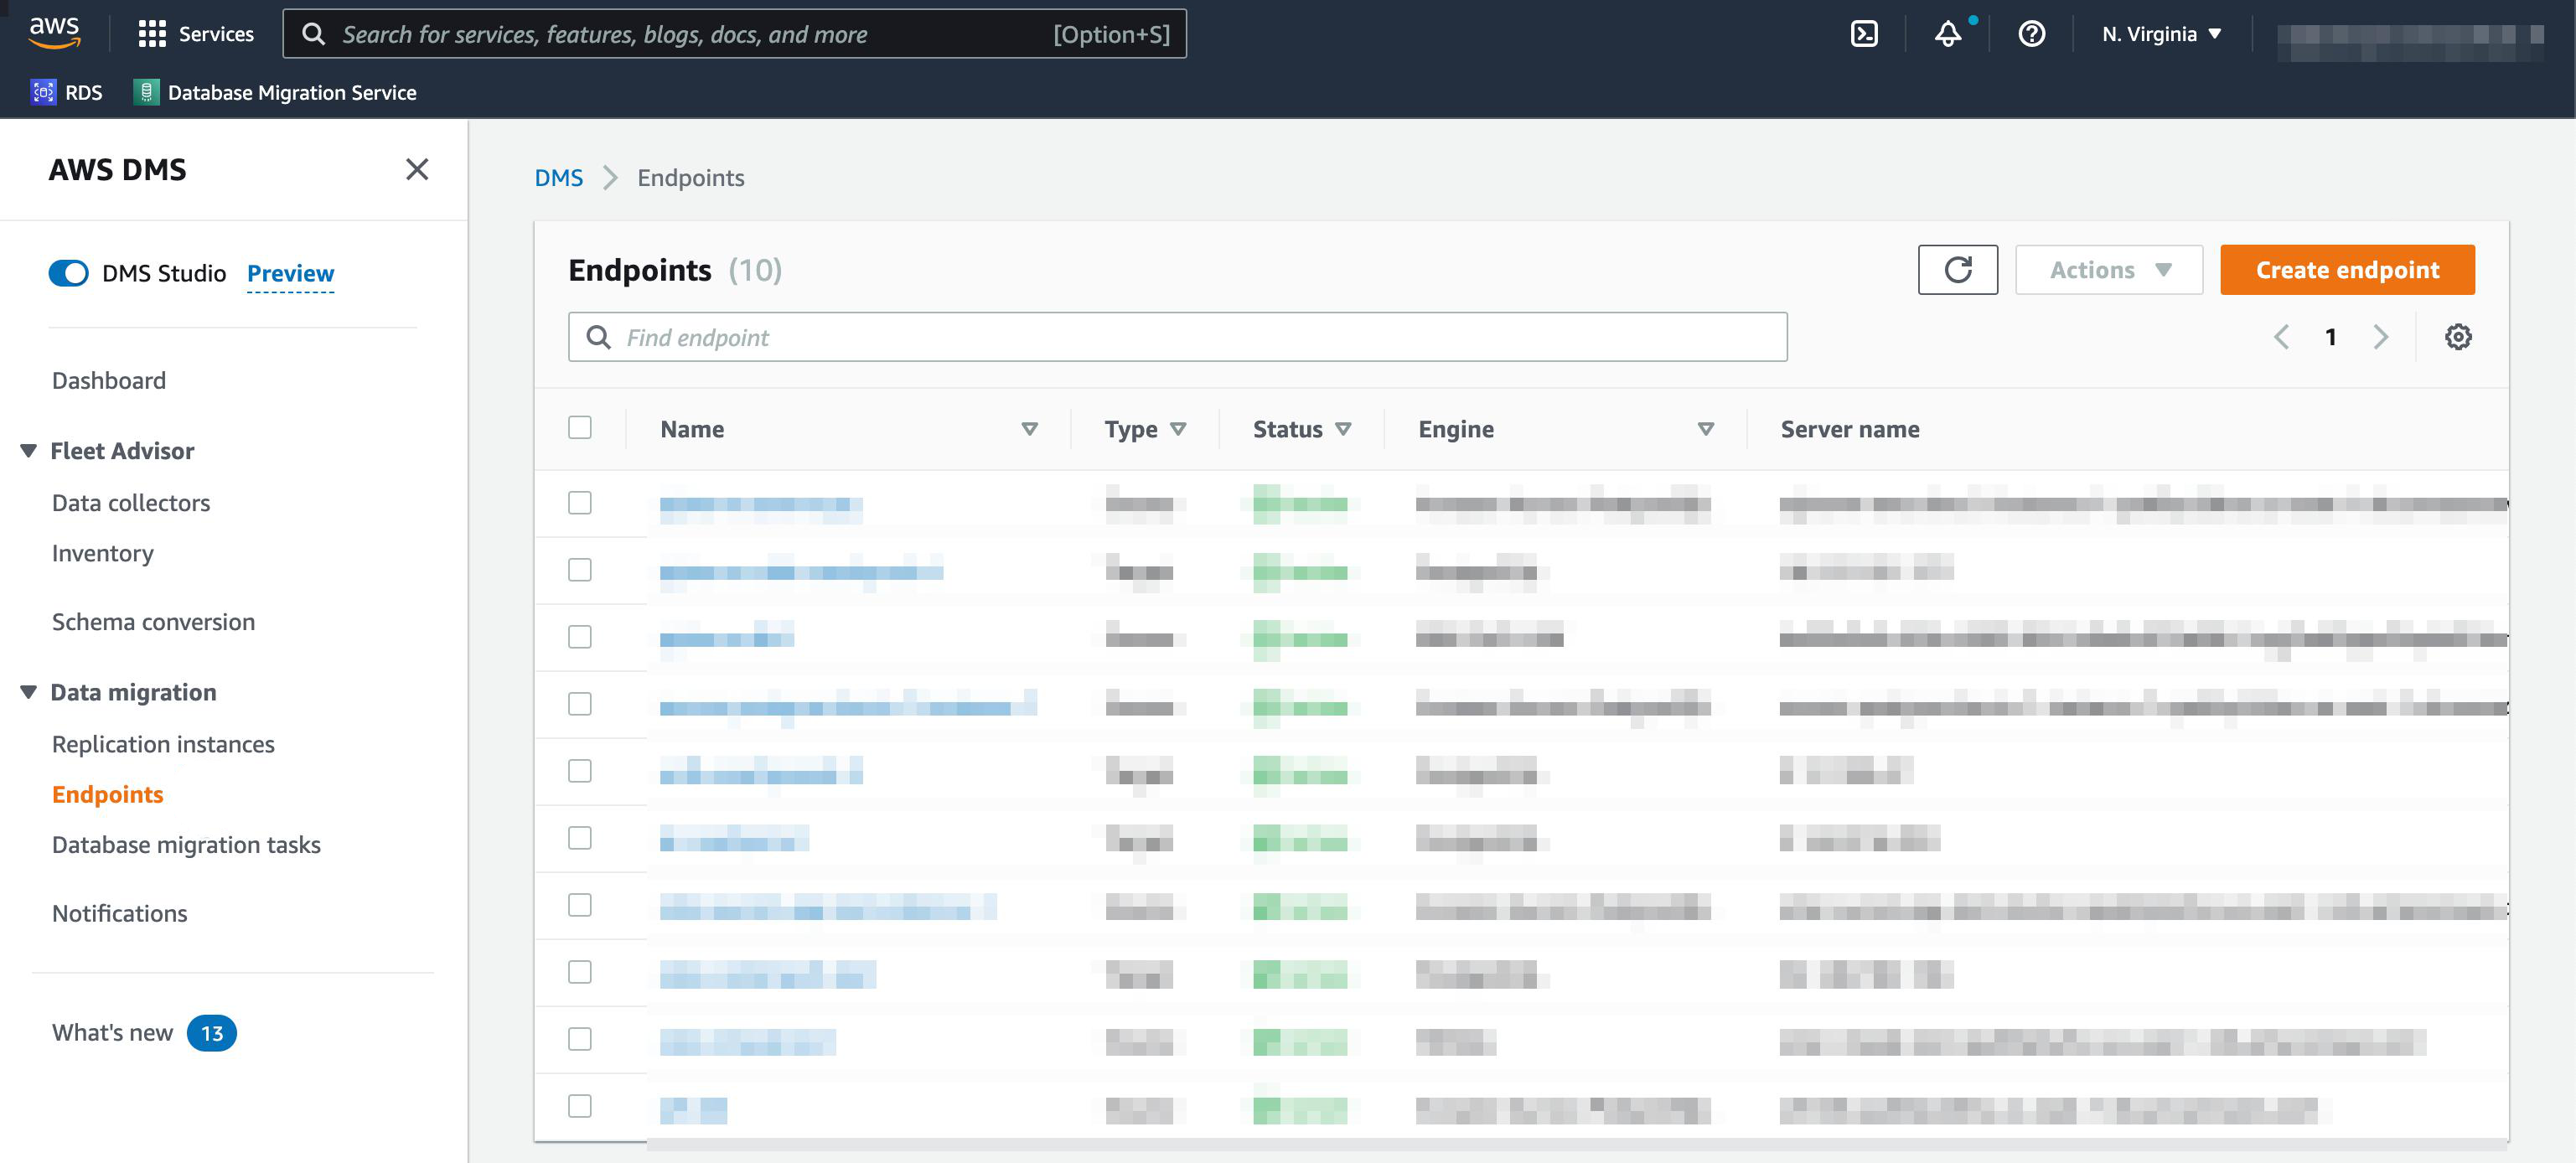
A configuration page will open.
In the Endpoint type section, select Target endpoint.
Supply an Endpoint identifier to identify the new target endpoint.
In the Target engine dropdown, select PostgreSQL.
Under Access to endpoint database, select Provide access information manually.
For information about where to find CockroachDB connection parameters, see Connect to a CockroachDB Cluster.
Enter the Server name and Port of your CockroachDB cluster.
Supply a User name, Password, and Database name from your CockroachDB cluster.
Note:To connect to a CockroachDB Serverless cluster, set the Database name to{serverless-hostname}.{database-name}. For details on how to find these parameters, see Connect to a CockroachDB Serverless cluster. Also set Secure Socket Layer (SSL) mode to require.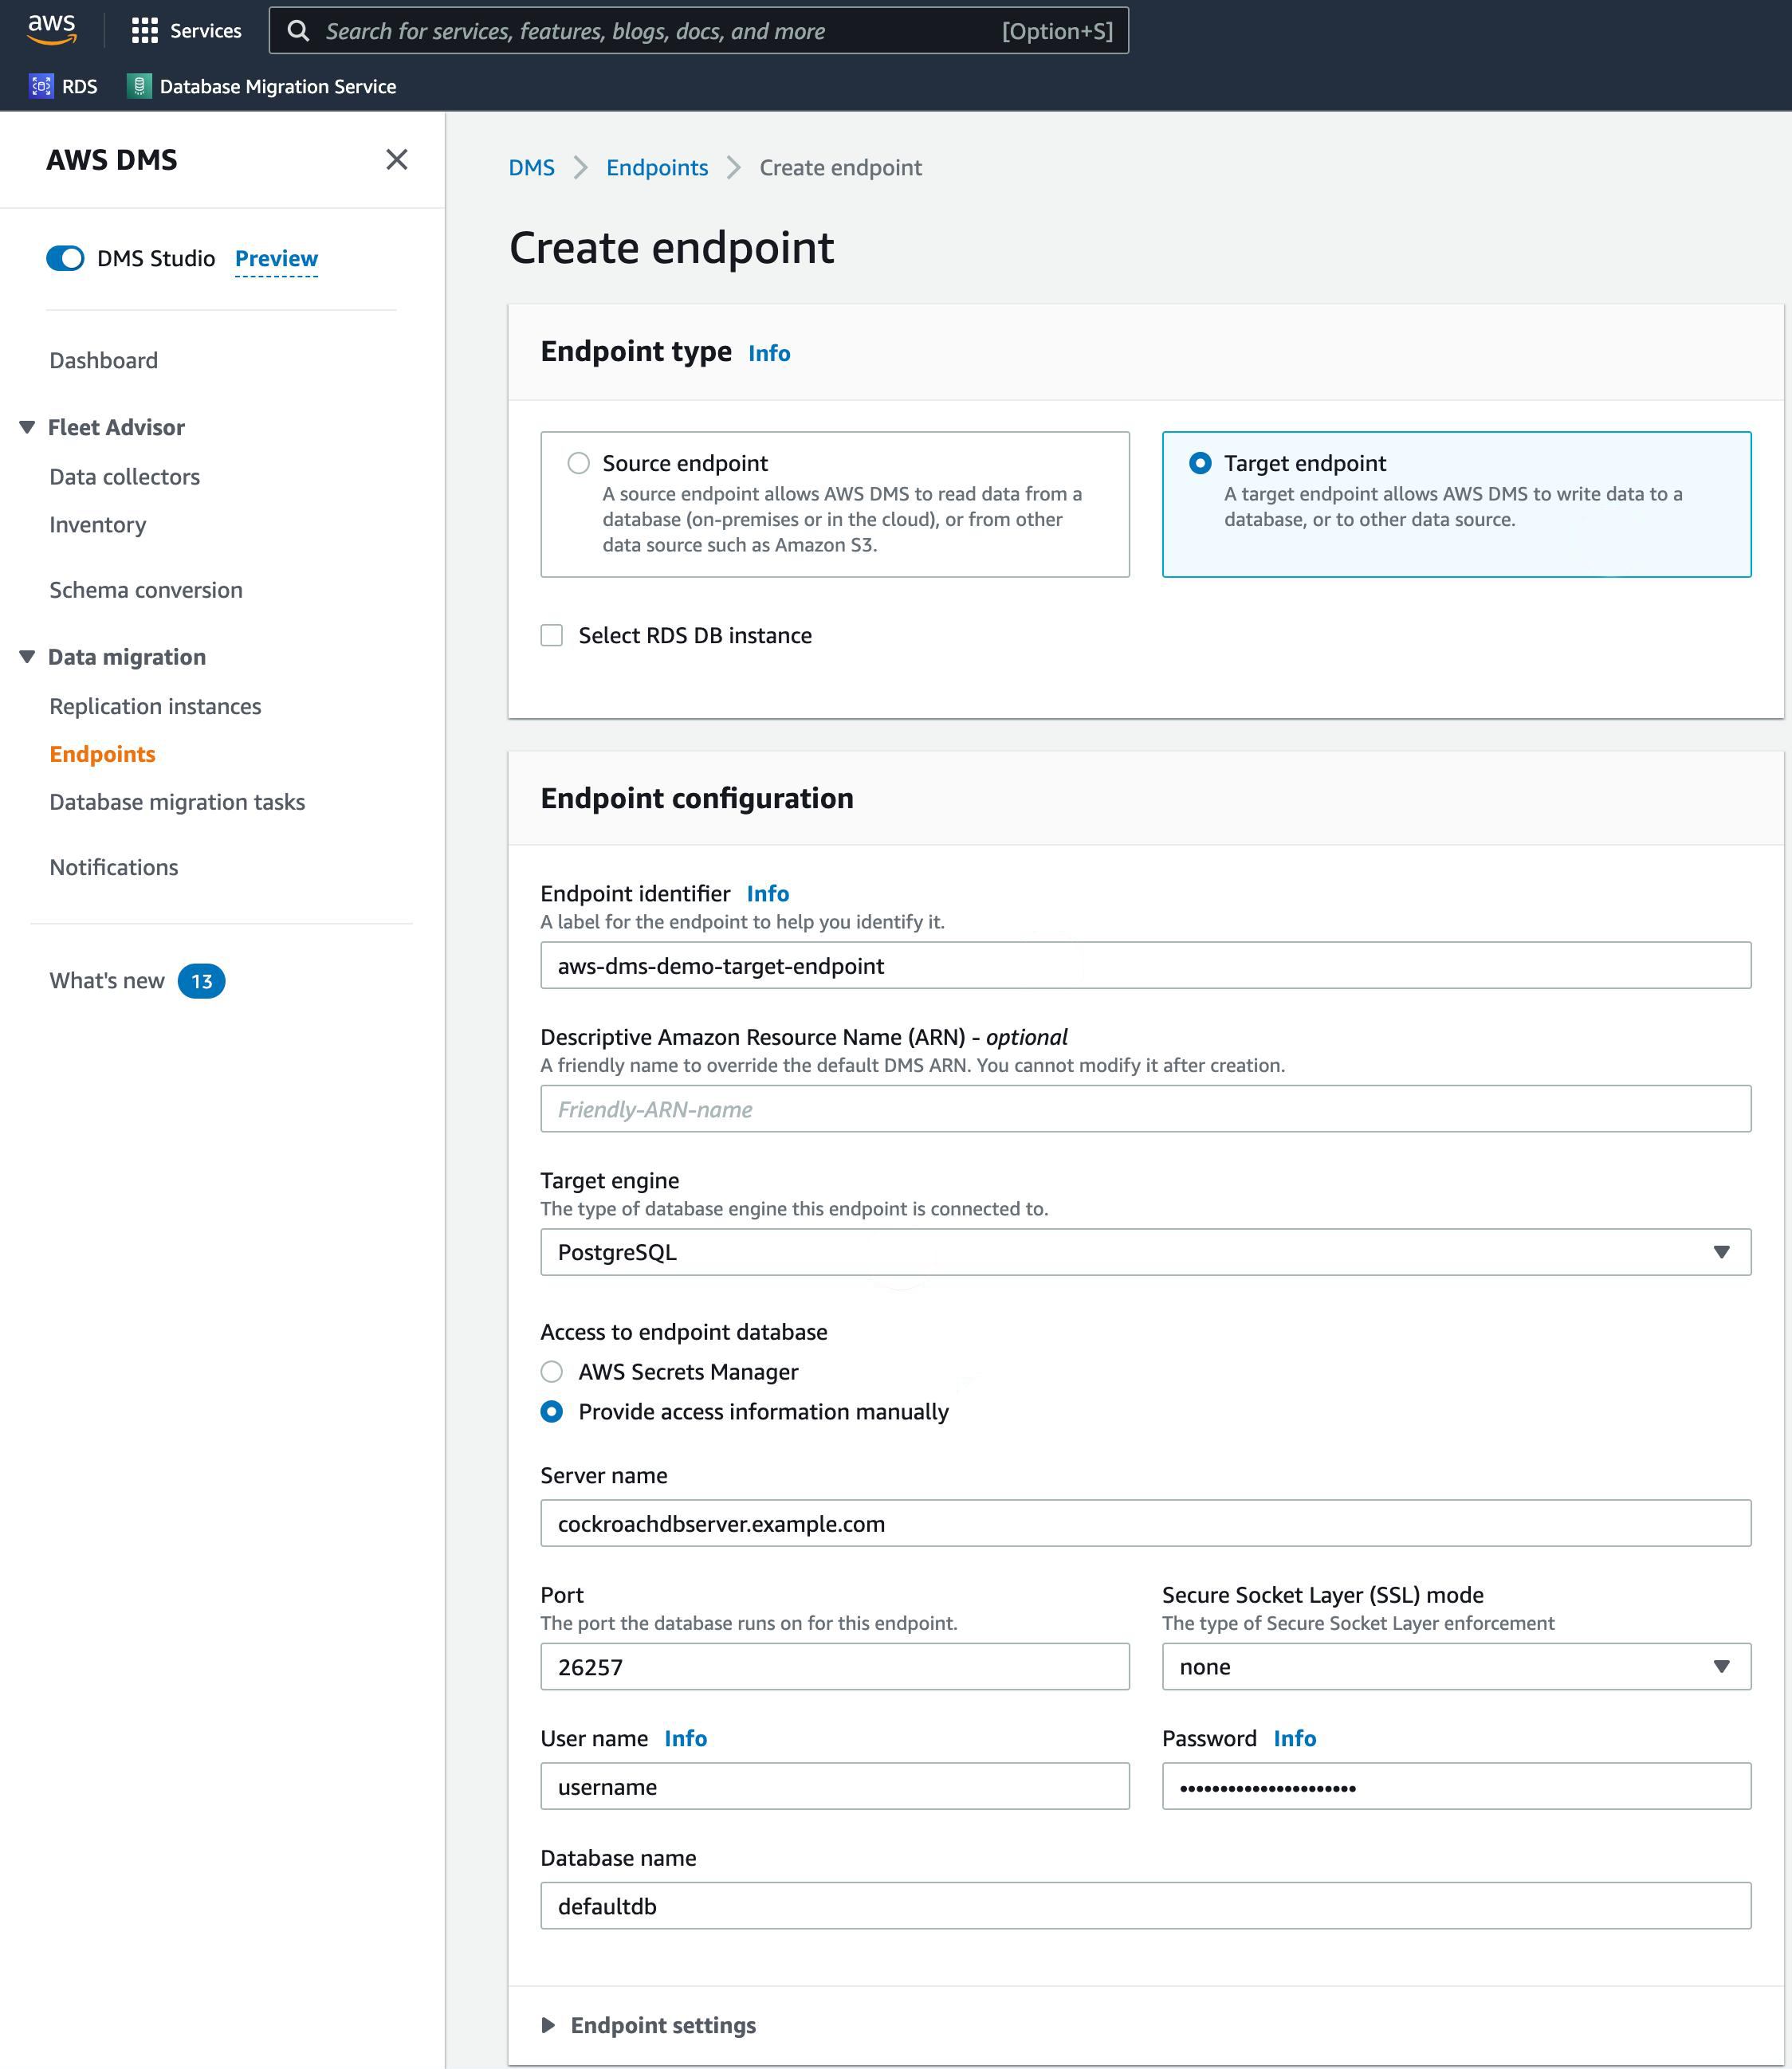
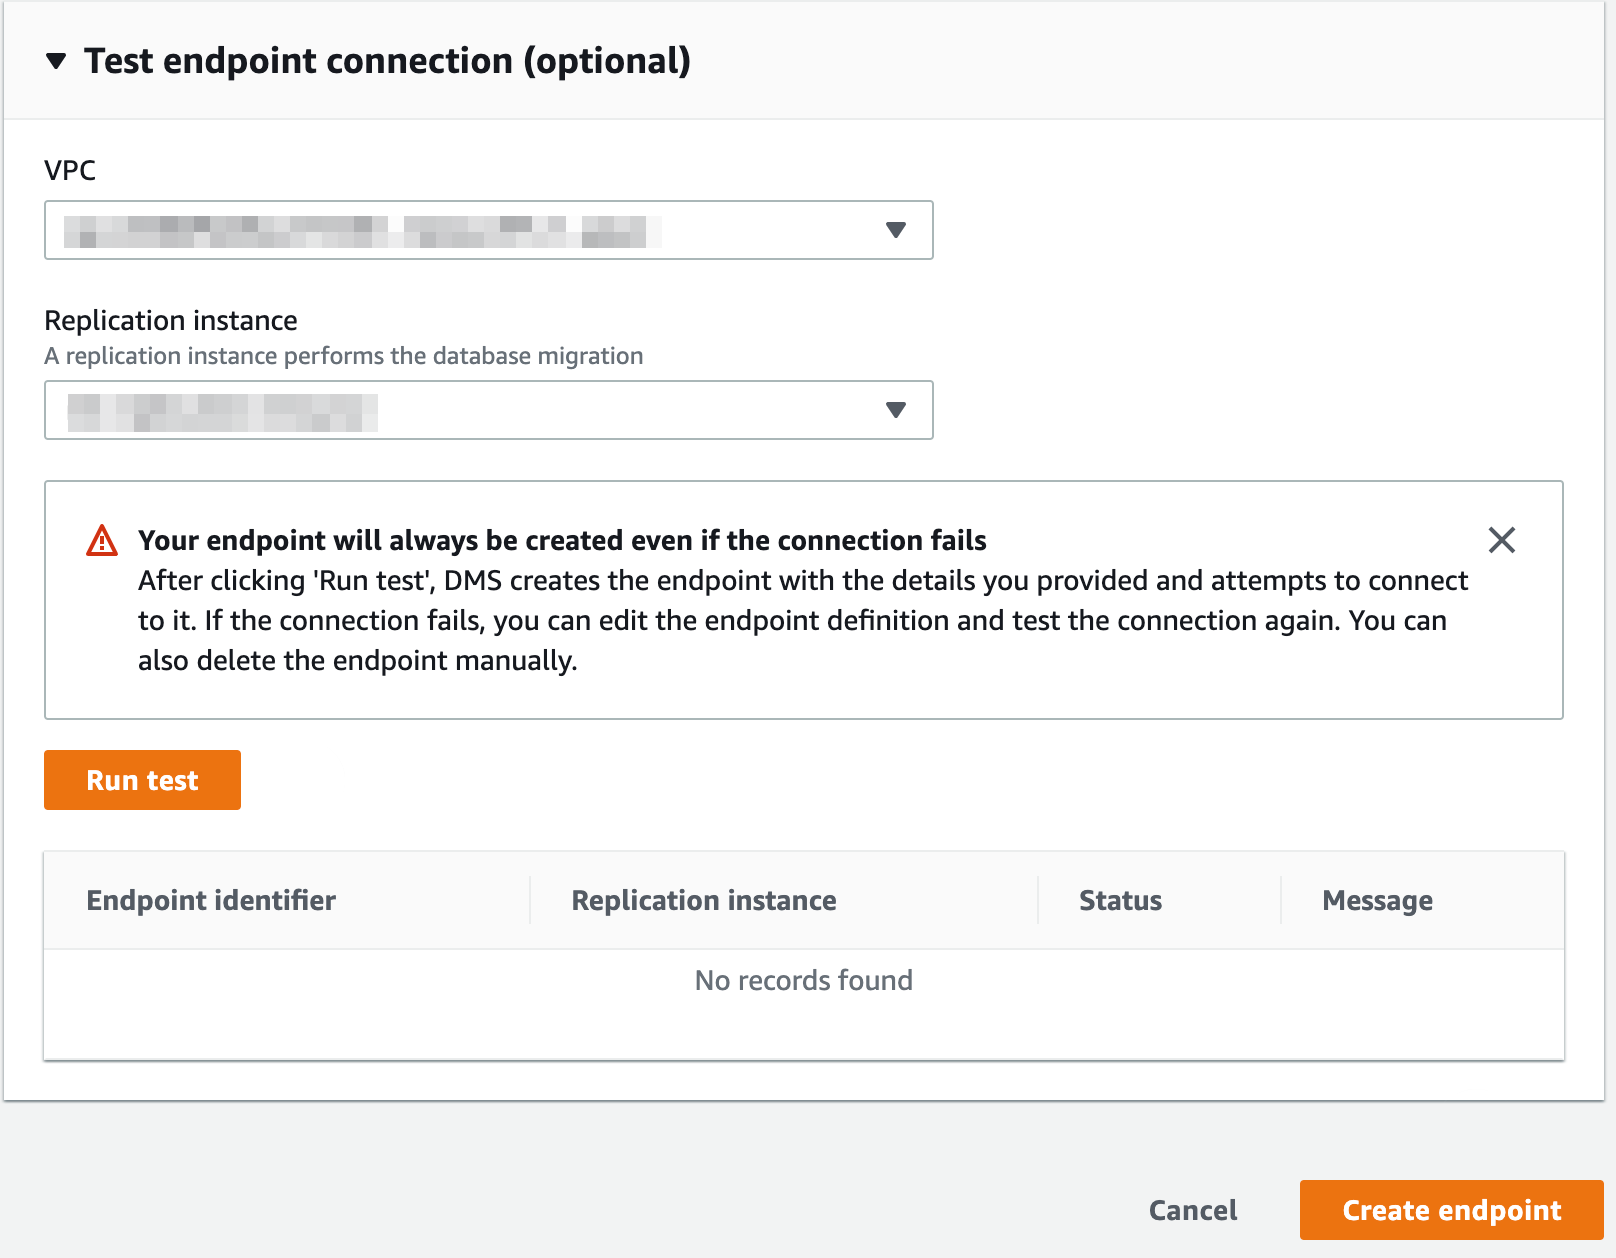
If needed, you can test the connection under Test endpoint connection (optional).
To create the endpoint, select Create endpoint.
Step 2. Create a database migration task
A database migration task, also known as a replication task, controls what data are moved from the source database to the target database.
To conserve CPU, consider migrating tables in multiple replication tasks, rather than performing a full load in a single task.
Step 2.1. Task configuration
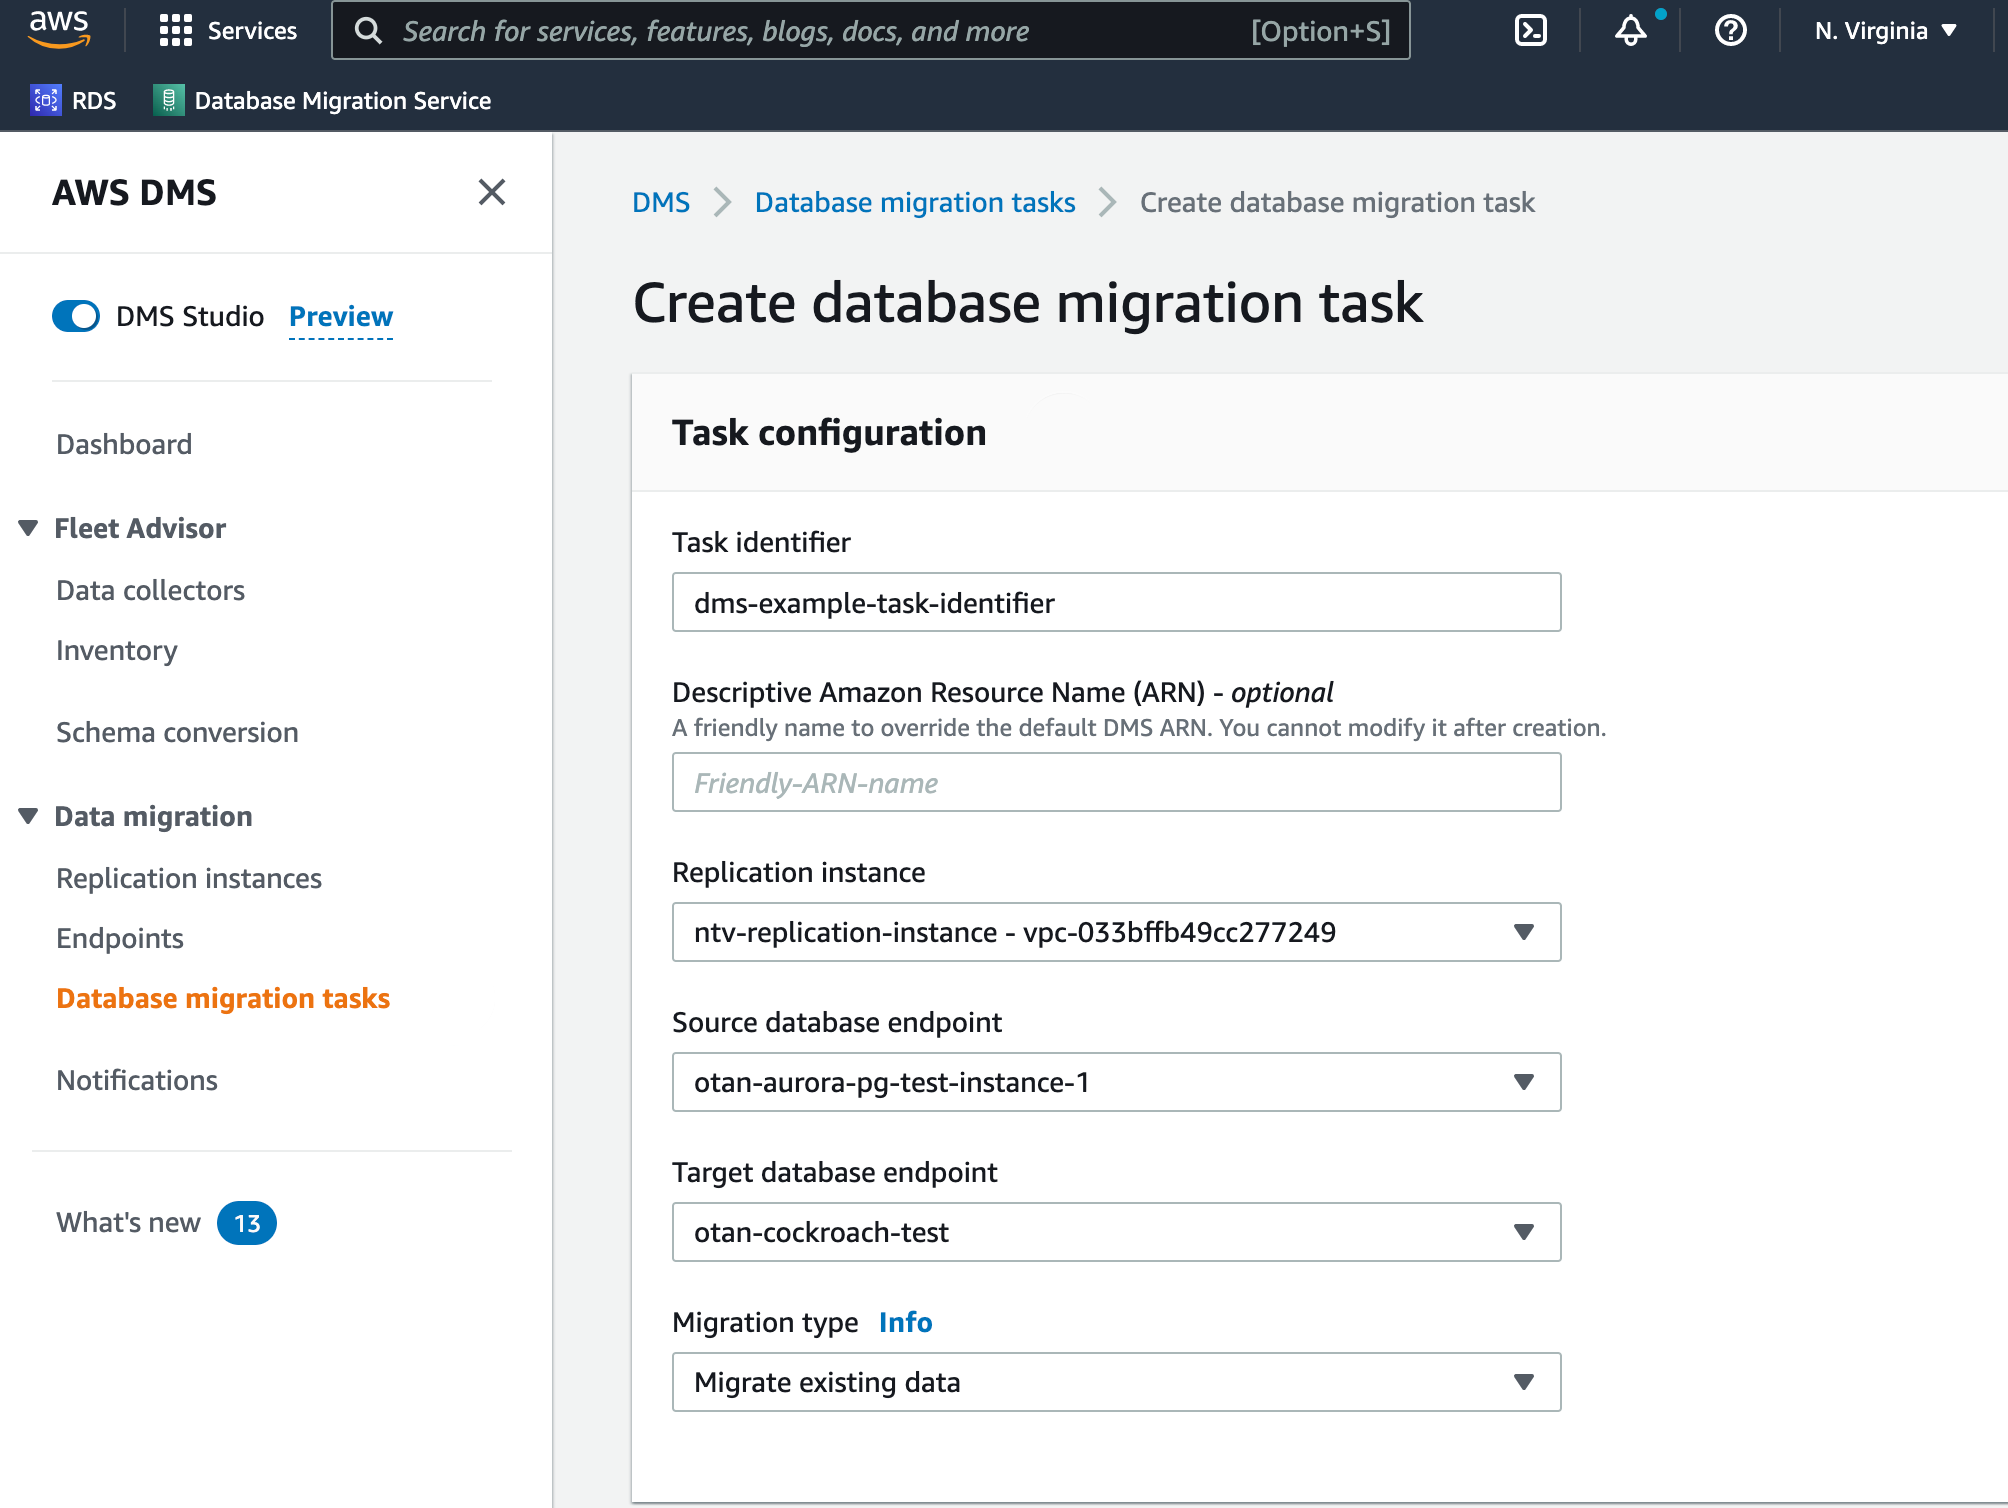
- While in AWS DMS, select Database migration tasks in the sidebar. A list of database migration tasks will display, if any exist.
In the top-right portion of the window, select Create task.
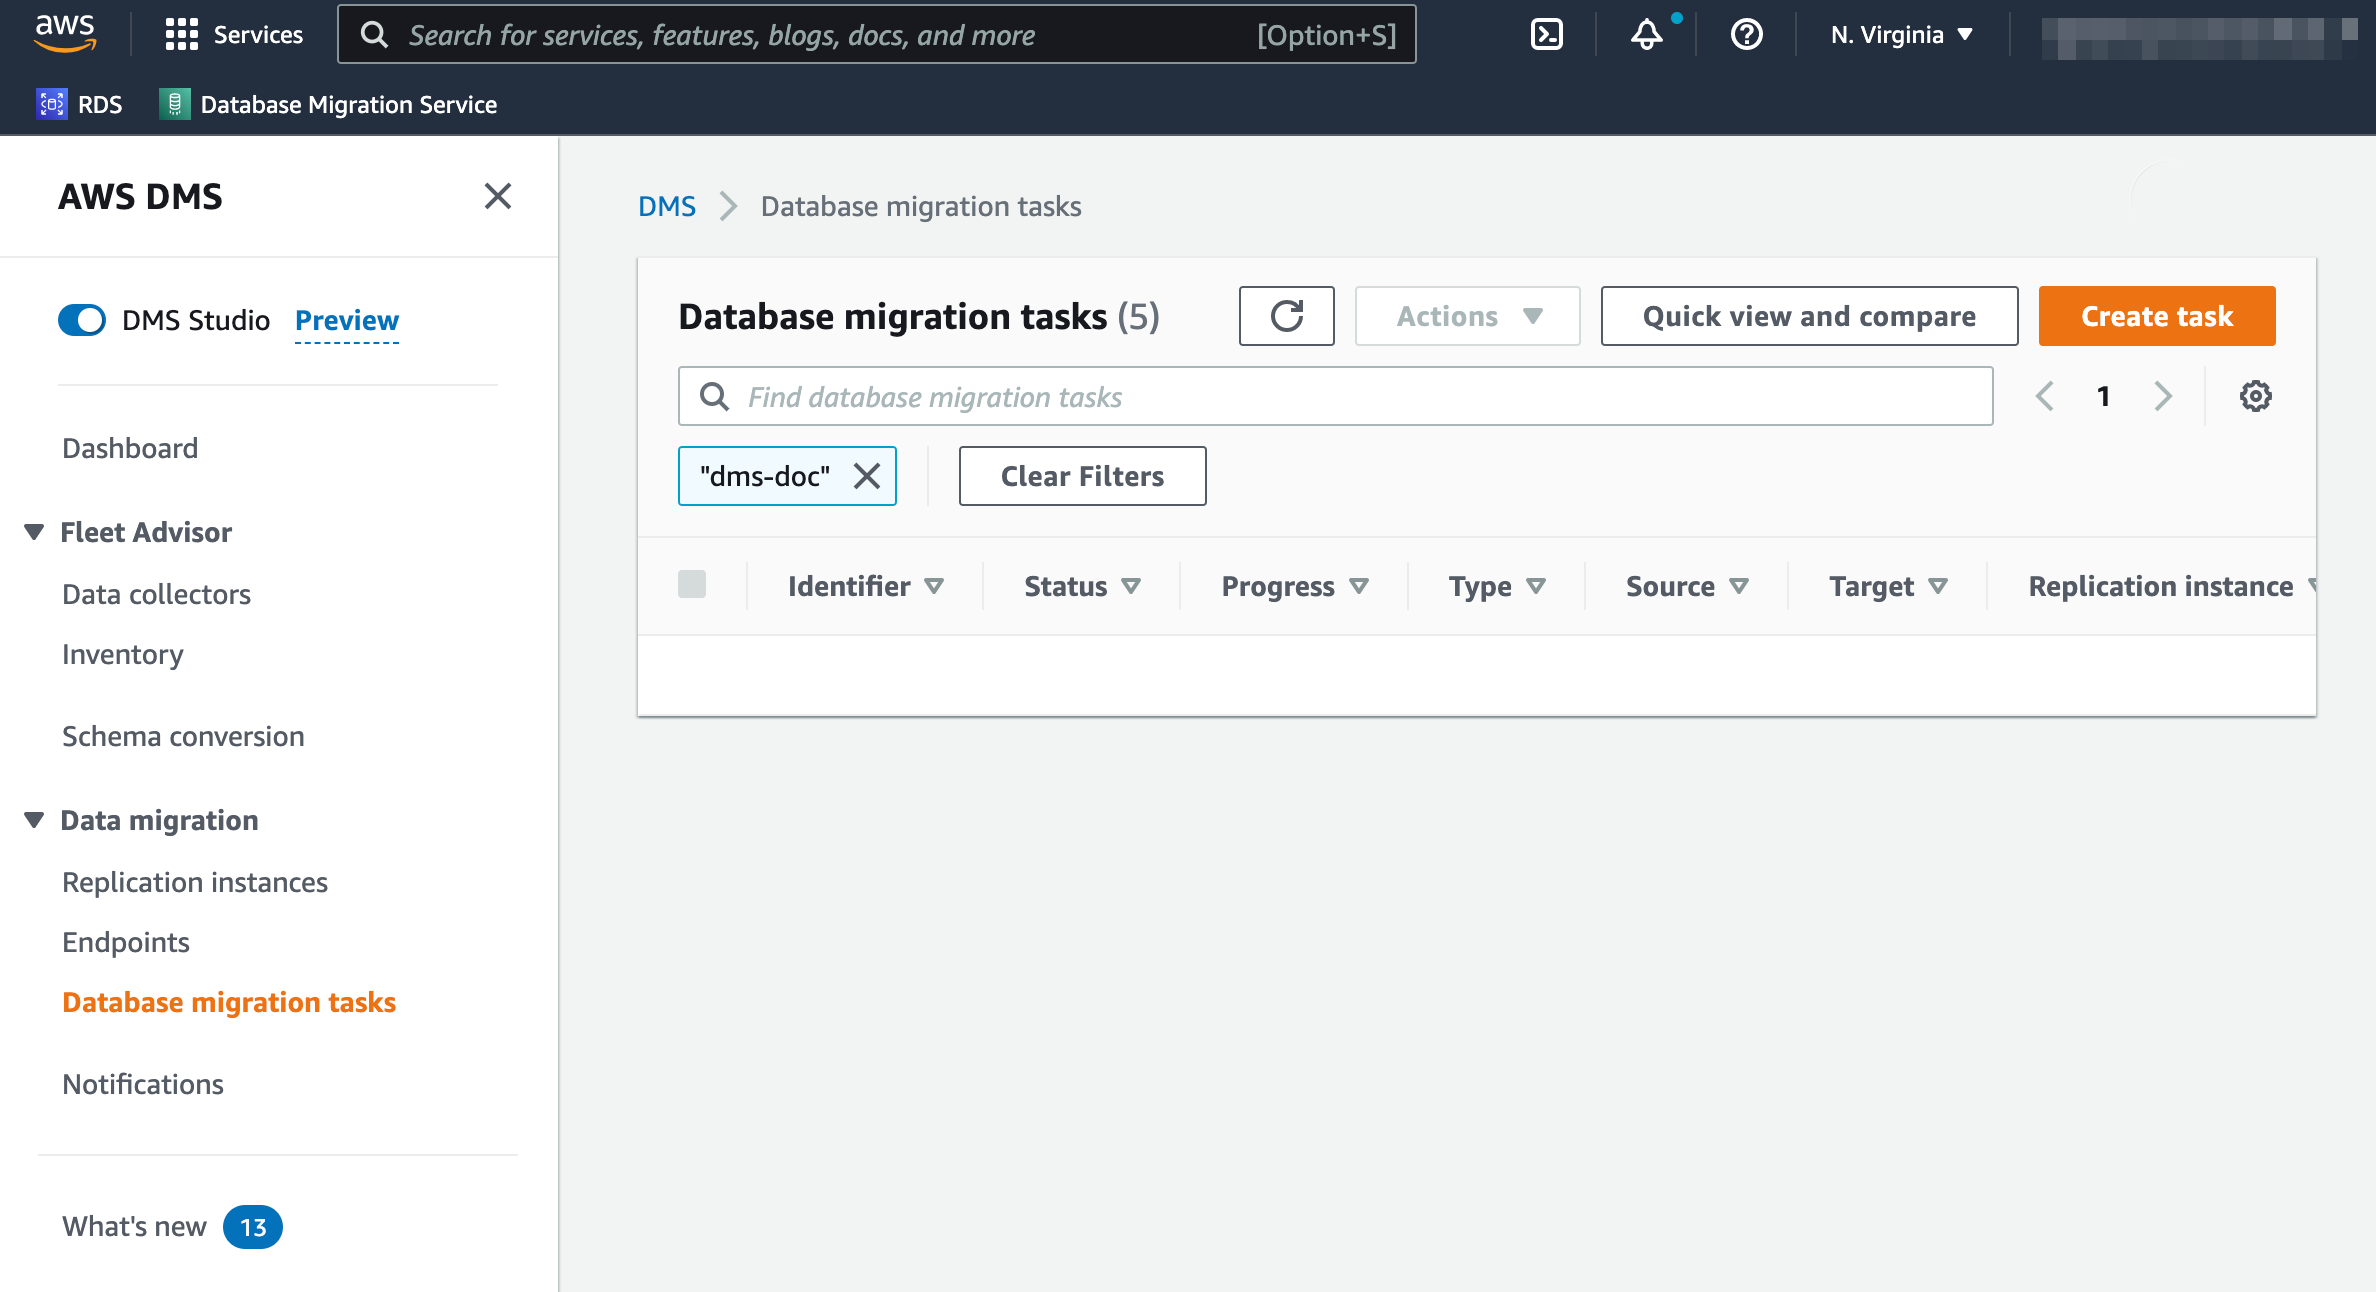
A configuration page will open.
Supply a Task identifier to identify the replication task.
Select the Replication instance and Source database endpoint you created prior to starting this tutorial.
For the Target database endpoint dropdown, select the CockroachDB endpoint created in the previous section.
Select the appropriate Migration type based on your needs.
Warning:If you choose Migrate existing data and replicate ongoing changes or Replicate data changes only, you must first disable revision history for backups.
Step 2.2. Task settings
- For the Editing mode radio button, keep Wizard selected.
- To preserve the schema you manually created, select Truncate or Do nothing for the Target table preparation mode.
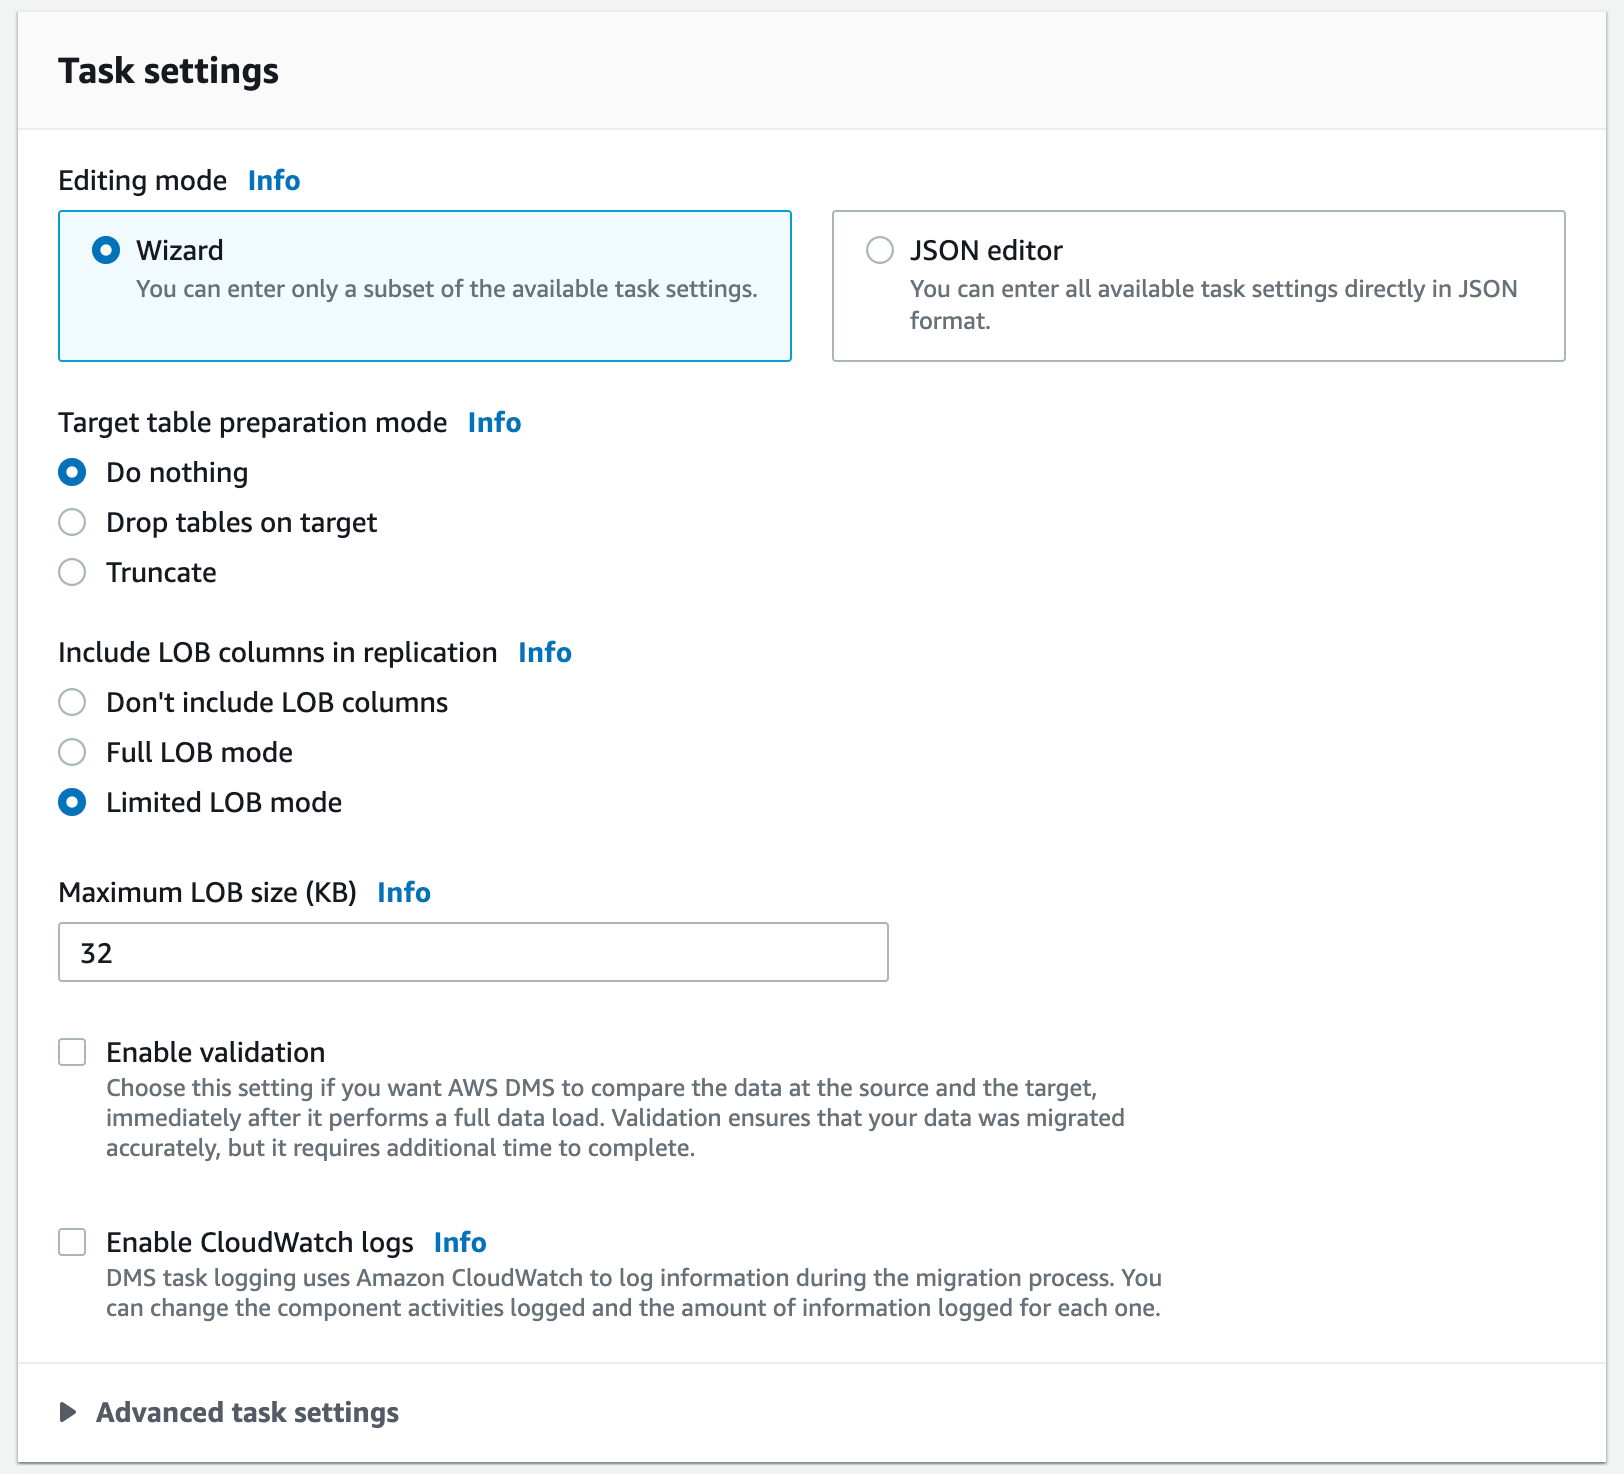
- Optionally check Enable validation to compare the data in the source and target rows, and verify that the migration succeeded. You can view the results in the Table statistics for your migration task. For more information about data validation, see the AWS documentation.
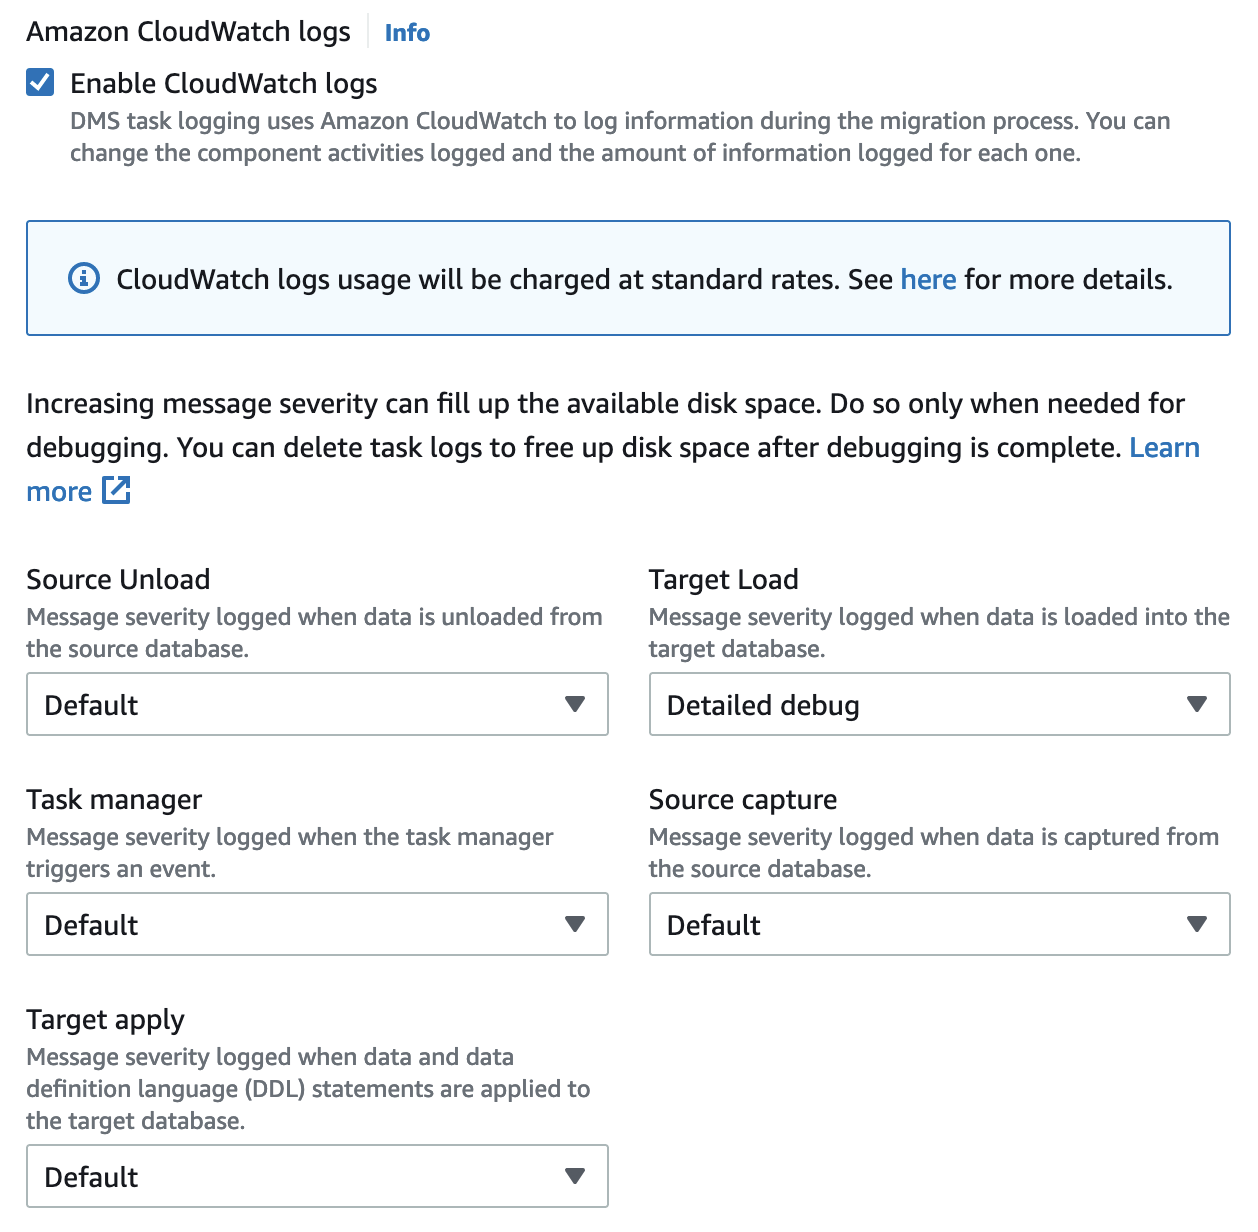
- Check the Enable CloudWatch logs option. We highly recommend this for troubleshooting potential migration issues.
- For the Target Load, select Detailed debug.
Step 2.3. Table mappings
When specifying a range of tables to migrate, the following aspects of the source and target database schema must match unless you use transformation rules:
- Column names must be identical.
- Column types must be compatible.
- Column nullability must be identical.
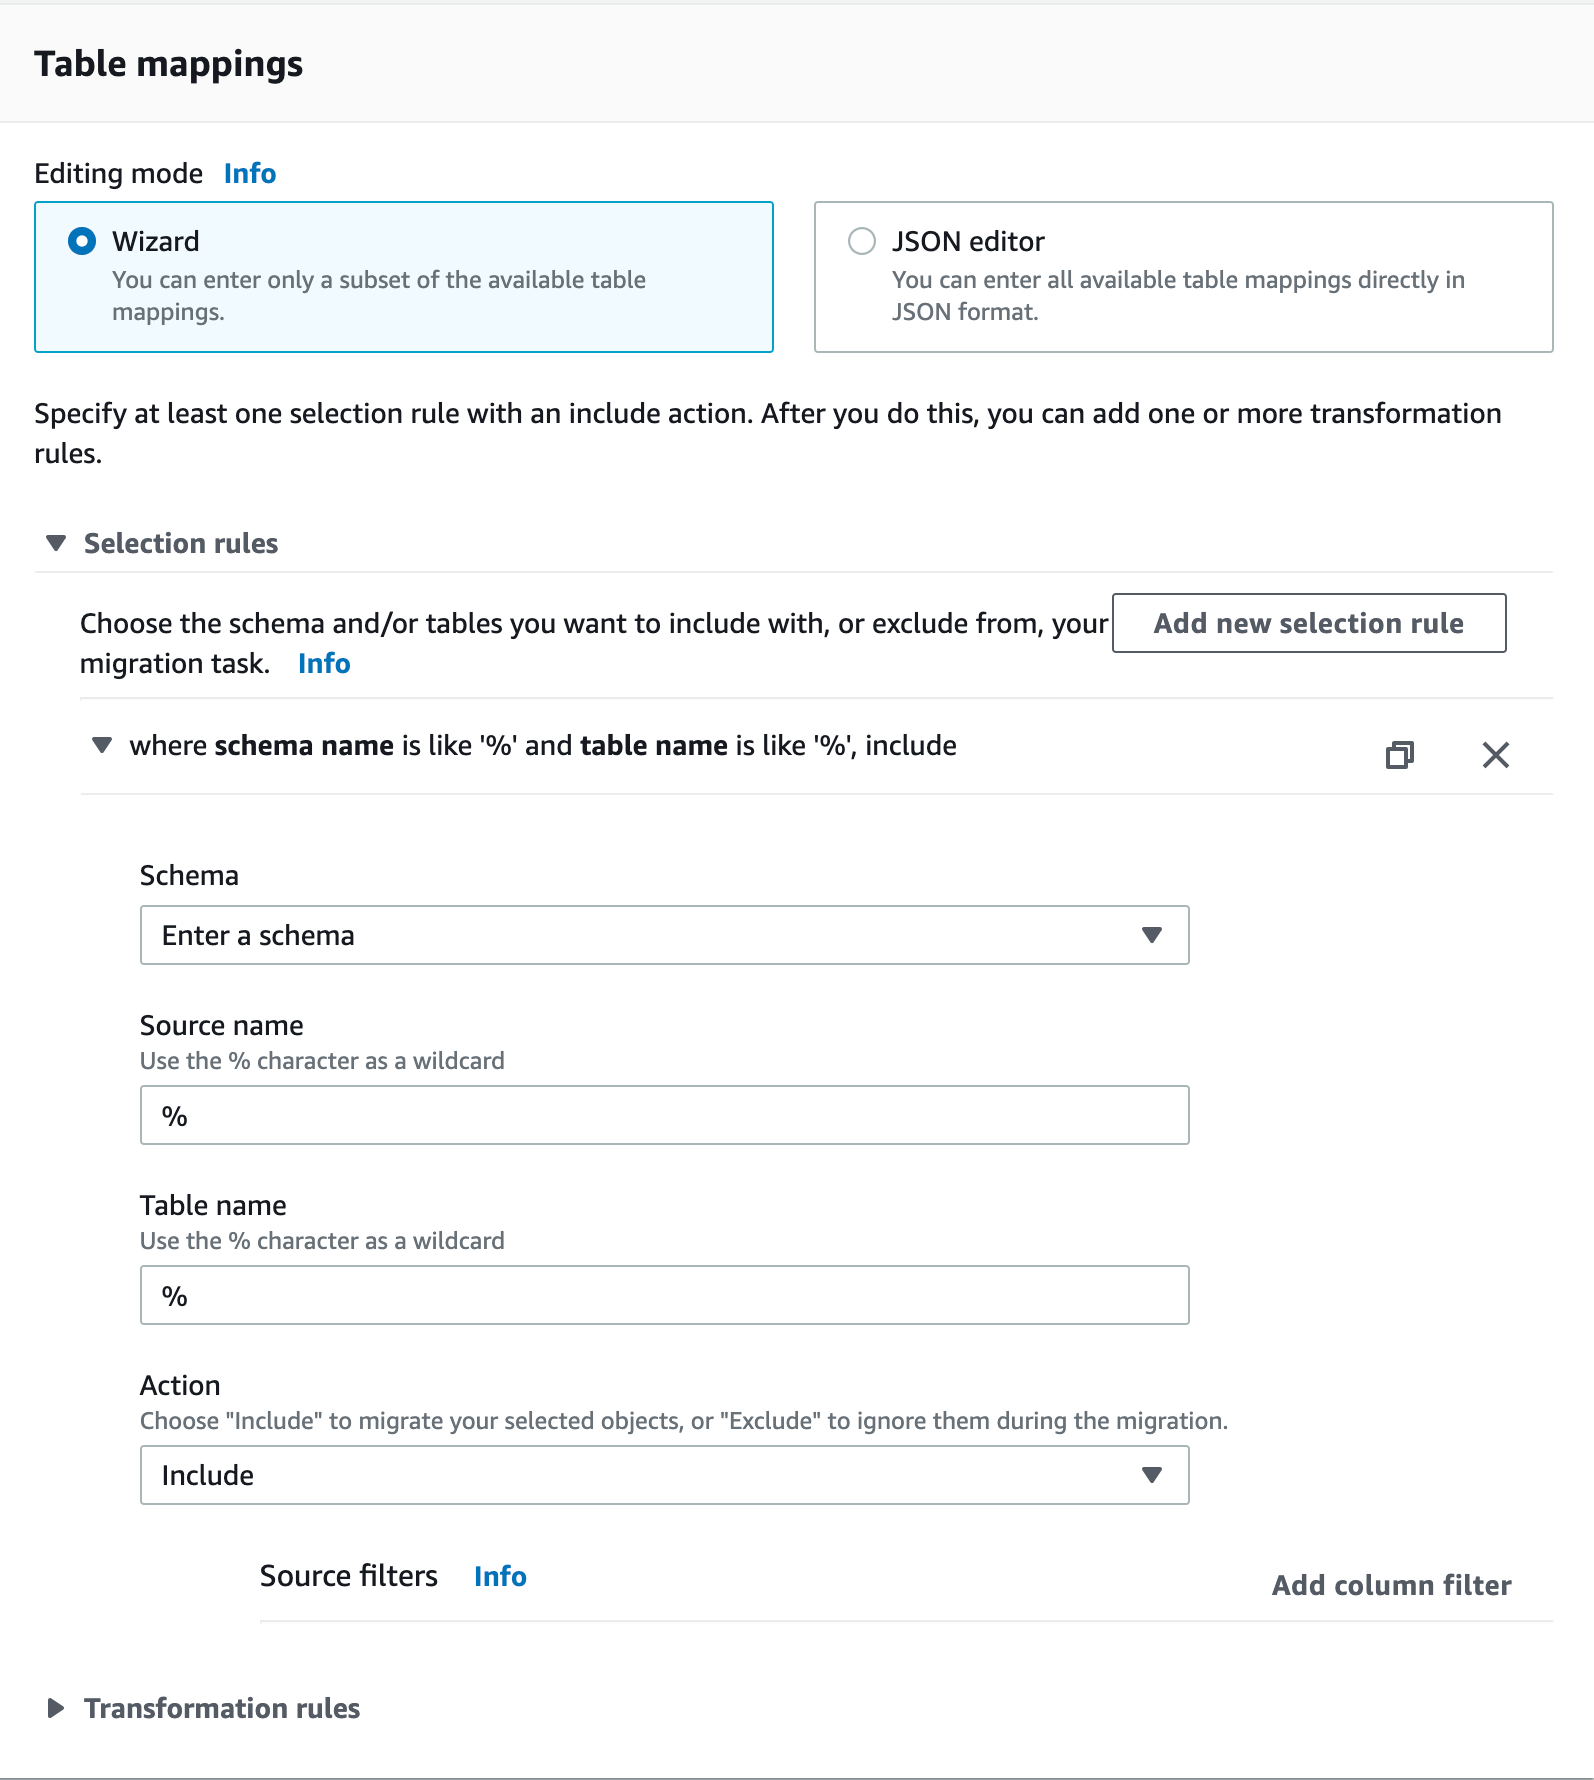
- For the Editing mode radio button, keep Wizard selected.
- Select Add new selection rule.
- In the Schema dropdown, select Enter a schema.
Supply the appropriate Source name (schema name), Table name, and Action.
 Note:
Note:Use
%as an example of a wildcard for all schemas in a PostgreSQL database. However, in MySQL, using%as a schema name imports all the databases, including the metadata/system ones, as MySQL treats schemas and databases as the same.To improve full-load performance, consider defining a parallel load setting for selected columns. A parallel load splits the full-load task into multiple threads. For example:
"parallel-load": {
   "type": "ranges",
   "columns": [
       "id"
   ],
   "boundaries": [
       [
           5000000
       ],
       [
           10000000
       ],
       ...
   ]
}
For details, see the AWS documentation.
Step 3. Verify the migration
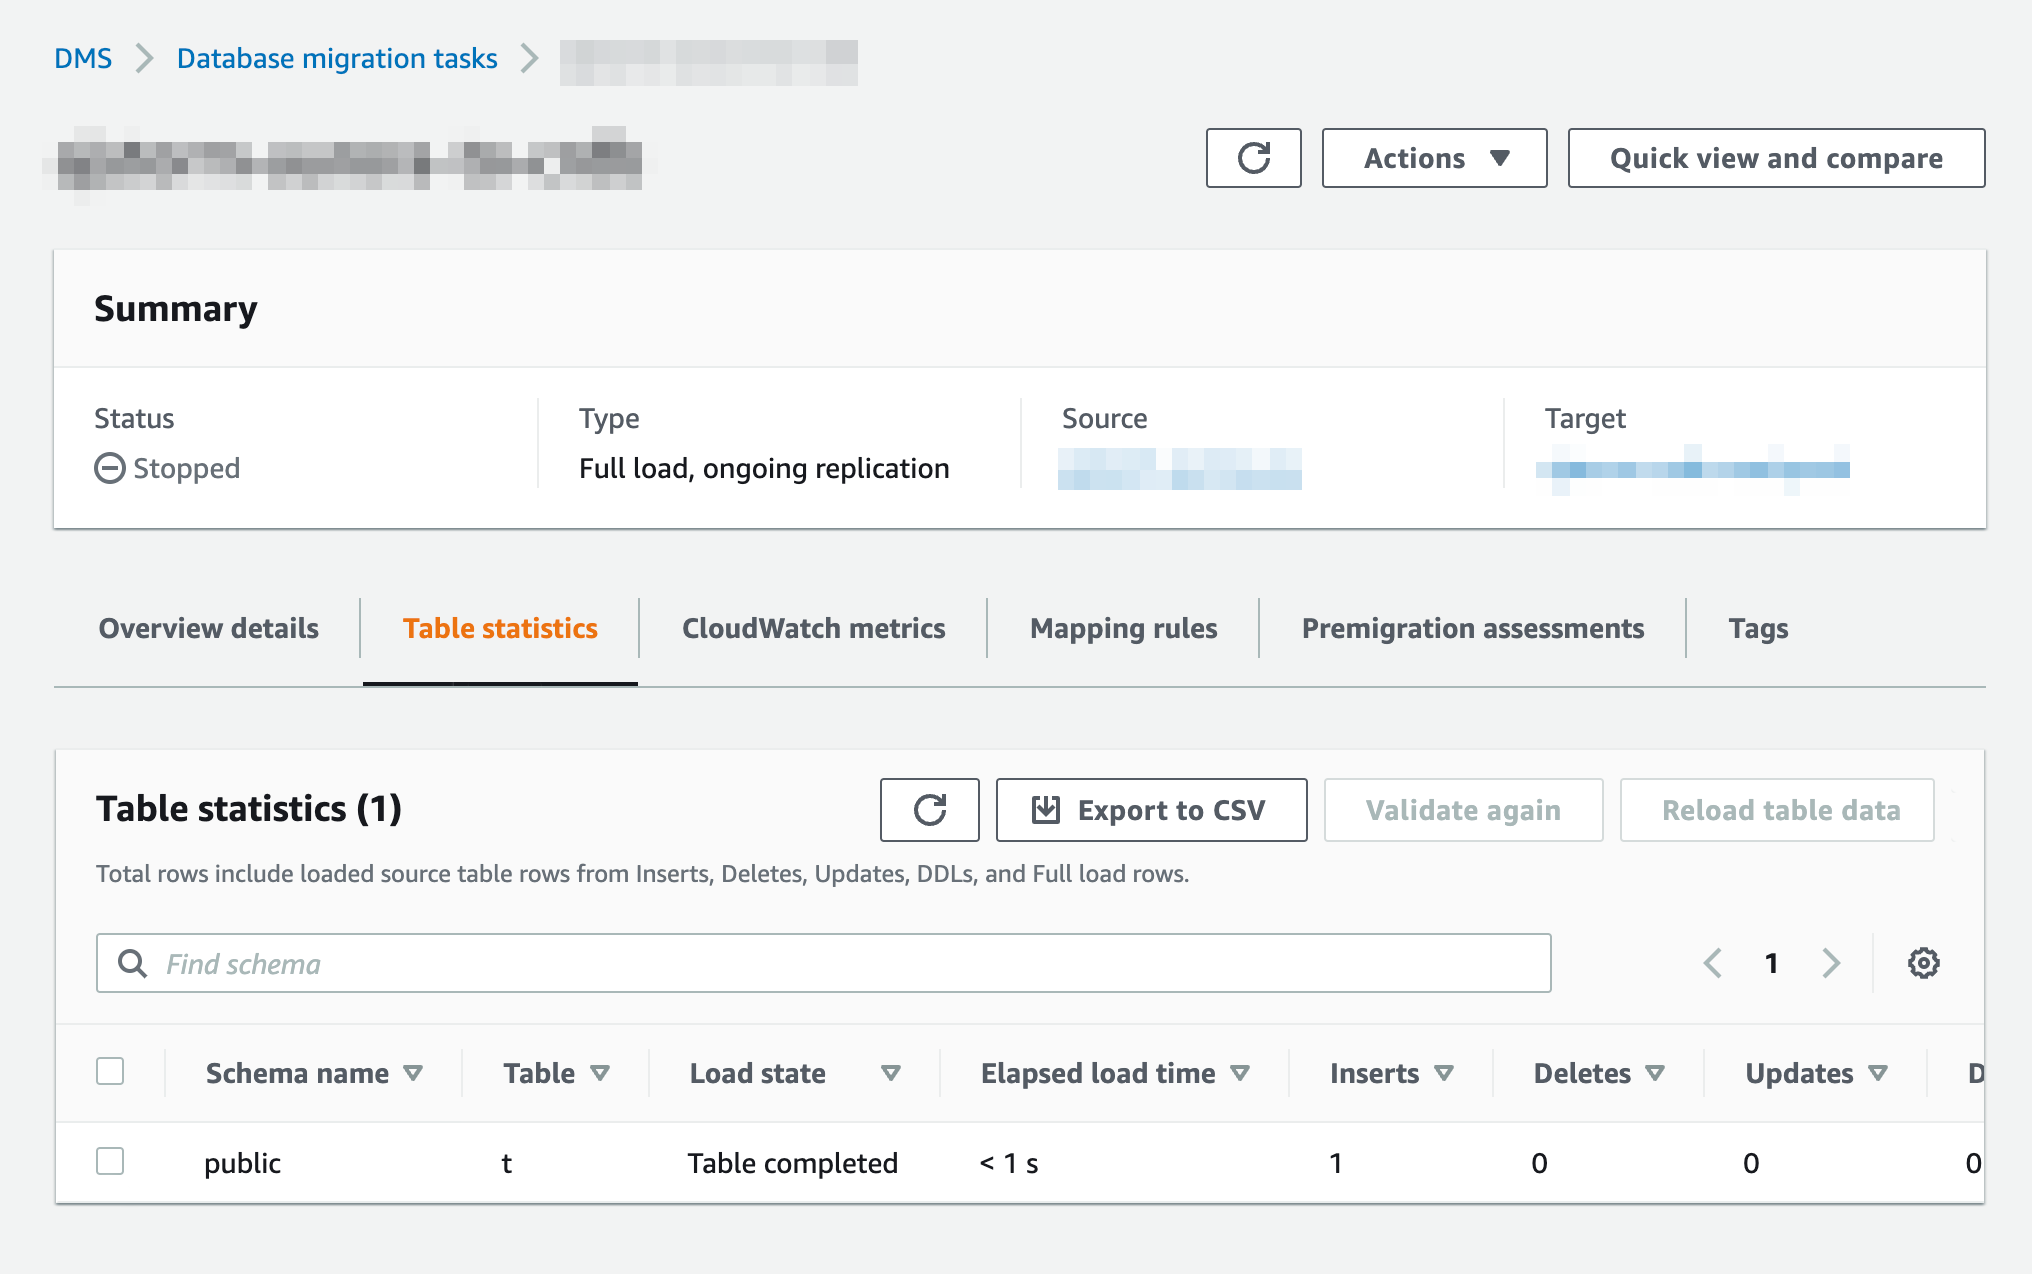
Data should now be moving from source to target. You can analyze the Table Statistics page for information about replication.
Do not issue reads while AWS DMS is running. AWS DMS runs explicit transactions, which can cause contention. If you need to issue reads, use follower reads.
- In AWS DMS, open Database migration tasks in the sidebar.
- Select the task you created in Step 2.
- Select Table statistics below the Summary section.
If your migration succeeded, you should now:
- Re-enable revision history for cluster backups.
- Re-create any constraints that you dropped before migrating.
If your migration failed for some reason, you can check the checkbox next to the table(s) you wish to re-migrate and select Reload table data.
Optional configurations
AWS PrivateLink
If using CockroachDB Dedicated, you can enable AWS PrivateLink to securely connect your AWS application with your CockroachDB Dedicated cluster using a private endpoint. To configure AWS PrivateLink with CockroachDB Dedicated, see Network Authorization.
BatchApplyEnabled
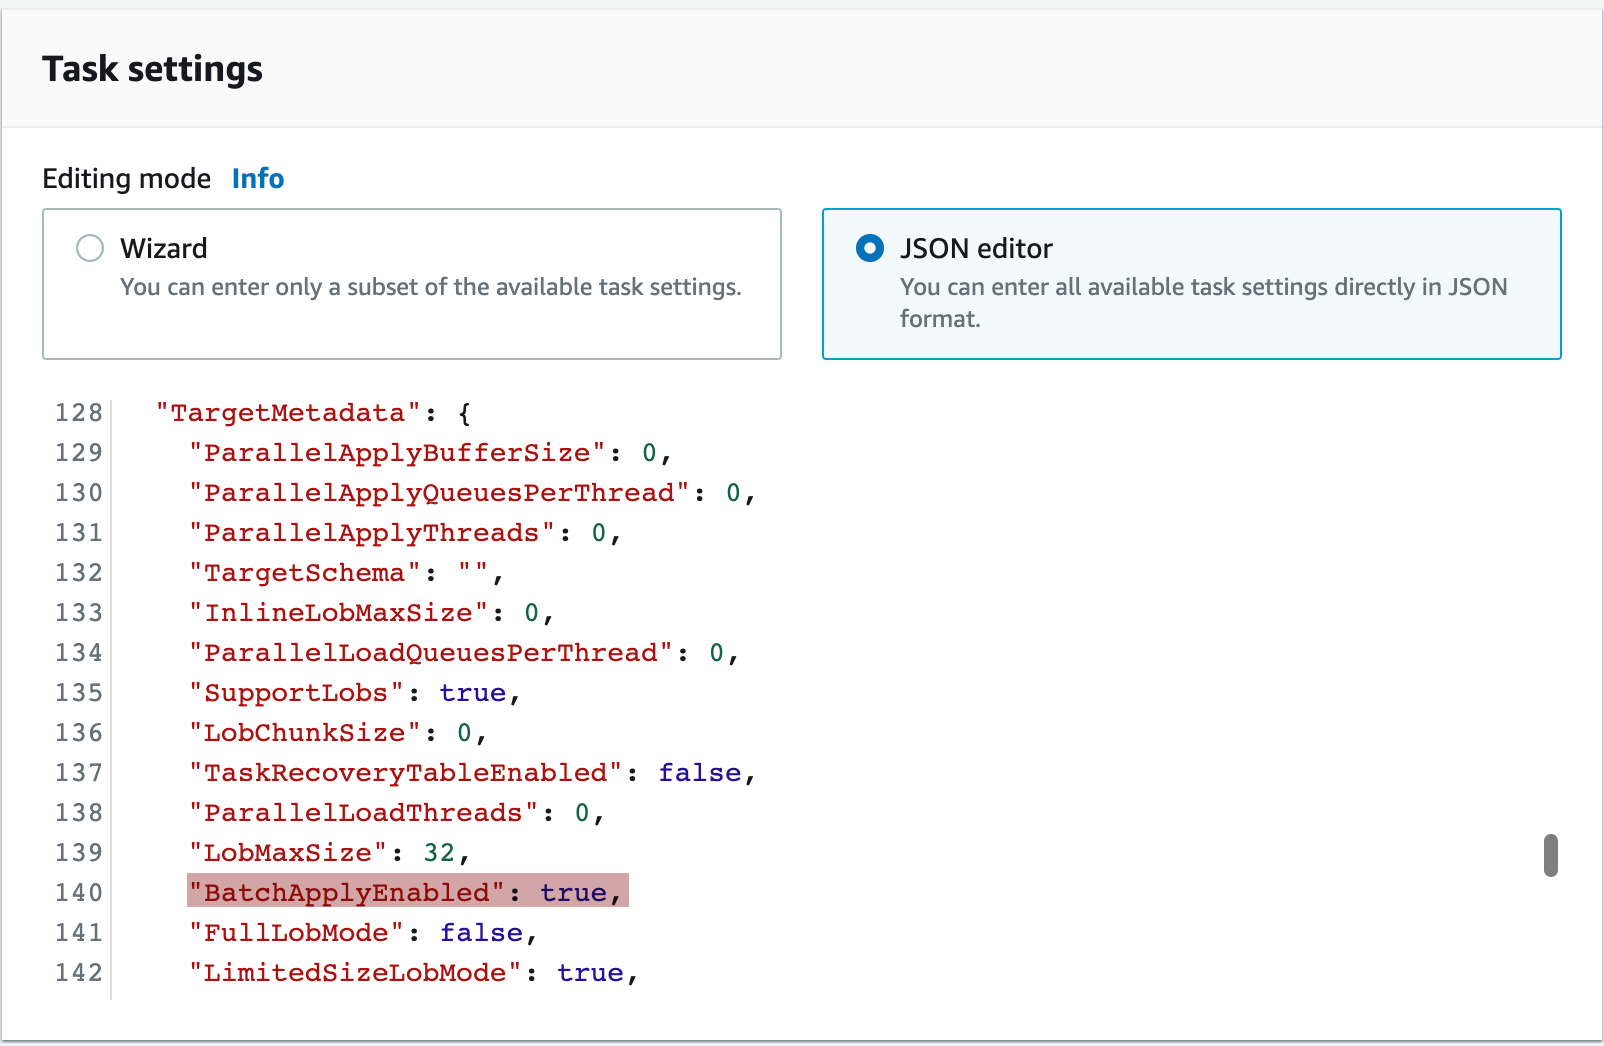
The BatchApplyEnabled setting can improve replication performance and is recommended for larger workloads.
- Open the existing database migration task.
- Choose your task, and then choose Modify.
- From the Task settings section, switch the Editing mode from Wizard to JSON editor. Locate the
BatchApplyEnabledsetting and change its value totrue. Information about theBatchApplyEnabledsetting can be found here.
BatchApplyEnabled does not work when using Drop tables on target as a target table preparation mode. Thus, all schema-related changes must be manually copied over if using BatchApplyEnabled.
Known limitations
When using Truncate or Do nothing as a target table preparation mode, you cannot include tables with any hidden columns. You can verify which tables contain hidden columns by executing the following SQL query:
SELECT table_catalog, table_schema, table_name, column_name FROM information_schema.columns WHERE is_hidden = 'YES';If you select Enable validation in your task settings and have a
TIMESTAMP/TIMESTAMPTZcolumn in your database, the migration will fail with the following error:Suspending the table : 1 from validation since we received an error message : ERROR: unknown signature: to_char(timestamp, string); No query has been executed with that handle with type : non-retryable(0) (partition_validator.c:514)This is resolved in v22.2.1. On earlier versions, do not select the Enable validation option if your database has a
TIMESTAMP/TIMESTAMPTZcolumn.If you are migrating from PostgreSQL, are using a
STRINGas aPRIMARY KEY, and have selected Enable validation in your task settings, validation can fail due to a difference in how CockroachDB handles case sensitivity in strings.To prevent this error, use
COLLATE "C"on the relevant columns in PostgreSQL or a collation such asCOLLATE "en_US"in CockroachDB.A migration to a multi-region cluster using AWS DMS will fail if the target database has regional by row tables. This is because the
COPYstatement used by DMS is unable to process thecrdb_regioncolumn in regional by row tables.To prevent this error, set the regional by row table localities to
REGIONAL BY TABLEand perform the migration. After the DMS operation is complete, set the table localities toREGIONAL BY ROW.
Troubleshooting common issues
For visibility into migration problems:
- Check the Amazon CloudWatch logs that you enabled for messages containing
SQL_ERROR. Check the CockroachDB
SQL_EXEClogs for messages related toCOPYstatements and the tables you are migrating. To access CockroachDB Dedicated logs, you should have configured log export to Amazon CloudWatch before beginning the DMS migration.Warning:Personally identifiable information (PII) may be exported to CloudWatch unless you redact the logs. Redacting logs may hide the data that is causing the issue, making it more difficult to troubleshoot.
- Check the Amazon CloudWatch logs that you enabled for messages containing
If you encounter errors like the following:
In the Amazon CloudWatch logs:
2022-10-21T13:24:07 [SOURCE_UNLOAD ]W: Value of column 'metadata' in table 'integrations.integration' was truncated to 32768 bytes, actual length: 116664 bytes (postgres_endpoint_unload.c:1072)In the CockroachDB logs:
could not parse JSON: unable to decode JSON: while decoding 51200 bytes at offset 51185Try selecting Full LOB mode in your task settings. If this does not resolve the error, select Limited LOB mode and gradually increase the Maximum LOB size until the error goes away. For more information about LOB (large binary object) modes, see the AWS documentation.
If you encounter a
TransactionRetryWithProtoRefreshErrorerror in the Amazon CloudWatch logs or CockroachDB logs when migrating an especially large table with millions of rows, and are running v22.2.4 or later, set the following session variables usingALTER ROLE ... SET {session variable}:ALTER ROLE {username} SET copy_from_retries_enabled = true;ALTER ROLE {username} SET copy_from_atomic_enabled = false;Then retry the migration.
The following error in the CockroachDB logs indicates that a large transaction such as an
INSERTorDELETEhas created more write intents than can be quickly resolved:a transaction has hit the intent tracking limit (kv.transaction.max_intents_bytes)This will likely cause high latency and transaction retries due to lock contention. Try raising the value of the
kv.transaction_max_intents_bytescluster setting to configure CockroachDB to use more memory for quick intent resolution. Note that this memory limit is applied per-transaction. To prevent unexpected memory usage at higher workload concurrencies, you should also have proper memory accounting.The following error in the CockroachDB logs indicates that AWS DMS is unable to copy into a table with a computed column:
cannot write directly to computed column ‹"column_name"›This is expected, as PostgreSQL does not allow copying into tables with a computed column. As a workaround, drop the generated column in CockroachDB and apply a transformation in DMS to exclude the computed column. Once the full load is done, add the computed column again in CockroachDB.
Run the following query from within the target CockroachDB cluster to identify common problems with any tables that were migrated. If problems are found, explanatory messages will be returned in the
cockroach sqlshell.WITH invalid_columns AS ( SELECT 'Table ' || table_schema || '.' || table_name || ' has column ' || column_name || ' which is hidden. Either drop the column or mark it as not hidden for DMS to work.' AS fix_me FROM information_schema.columns WHERE is_hidden = 'YES' AND table_name NOT LIKE 'awsdms_%' ), invalid_version AS ( SELECT 'This cluster is on a version of CockroachDB which does not support AWS DMS. CockroachDB v21.2.13+ or v22.1+ is required.' AS fix_me WHERE split_part( substr( substring( version(), e'v\\d+\\.\\d+.\\d+' ), 2 ), '.', 1 )::INT8 < 22 AND NOT ( split_part( substr( substring( version(), e'v\\d+\\.\\d+.\\d+' ), 2 ), '.', 1 )::INT8 = 21 AND split_part( substr( substring( version(), e'v\\d+\\.\\d+.\\d+' ), 2 ), '.', 2 )::INT8 = 2 AND split_part( substr( substring( version(), e'v\\d+\\.\\d+.\\d+' ), 2 ), '.', 3 )::INT8 >= 13 ) ), has_no_pk AS ( SELECT 'Table ' || a.table_schema || '.' || a.table_name || ' has column ' || a.column_name || ' has no explicit PRIMARY KEY. Ensure you are not using target mode "Drop tables on target" and that this table has a PRIMARY KEY.' AS fix_me FROM information_schema.key_column_usage AS a JOIN information_schema.columns AS b ON a.table_schema = b.table_schema AND a.table_name = b.table_name AND a.column_name = b.column_name WHERE b.is_hidden = 'YES' AND a.column_name = 'rowid' AND a.table_name NOT LIKE 'awsdms_%' ) SELECT fix_me FROM has_no_pk UNION ALL SELECT fix_me FROM invalid_columns UNION ALL SELECT fix_me FROM invalid_version;Refer to Debugging Your AWS DMS Migrations (Part 1, Part 2, and Part 3) on the AWS Database Blog.
If the migration is still failing, contact Support and include the following information when filing an issue:
- Source database name.
- CockroachDB version.
- Source database schema.
- CockroachDB database schema.
- Any relevant logs (e.g., the last 100 lines preceding the AWS DMS failure).
- Ideally, a sample dataset formatted as a database dump file or CSV.